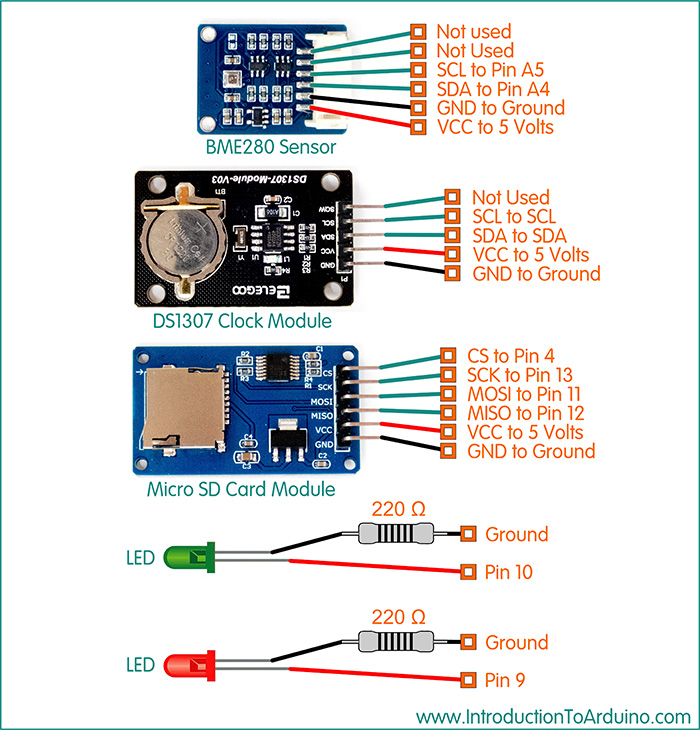
I figured I would need 4 main components to make this project work: sensors to collect data (BME280 Temperature, Pressure and Humidity Sensor), a clock for the time stamp (DS1307 Clock Module), an SD Card Module to write the data to a Micro SD card and finally a microcontroller to make all the magic happen (Arduino UNO). First I needed to figure out how to wire up all the components to the Arduino UNO (image shown above). If you have not already done so, you need to install a few libraries. These are easy to install and only need to be installed once. Go to Tools / Manage Libraries and search for these libraries:
Time (Time Library) Adafruit_Sensor (Adafruit Sensor Library) Adafruit_BME280 (BME280 Temperature, Humidity and Pressure Sensor Library) SPI (Serial Peripheral Interface Library) SD (SD Card Library) After wiring up our components, we need to set the clock. If your Real Time Clock module has an internal battery you only needs to preform this process once, but if the battery dies or is removed you will need to reset the clock again. If you are using a module without a battery, the module will keep time as long as power is maintained to the module, if the power is removed the clock will need to be reset again. I would suggest you use a module with an internal battery (code to set the time can be found at the bottom of this page). Now that we have our modules connected, our Libraries installed and the time set on our Real Time Clock Module, we can upload our code (found below). This code allows you to determine the logging interval by designating what part of the Day, Hour or Minute you wish to log. When the clock reaches the indicated time, an entry will be written to the file. The “||” symbol indicates “or” which allows you to choose multiple logs during a minute or hour. The code below indicated a new log will be recorded at the beginning of each minute (second 0), then at 15, 30 and 45 seconds. If you want to log every 15 minutes, just replace “tm.Second” with “tm.Minute”. You can alter the times and number of logging intervals to suit your application.
I have found it best to install a SD card in the module and then apply power to the Arduino (if you want the header sentence to be written to the file). After the code has been uploaded to the UNO, the logger will add a header to the text file and then log data at set intervals. If the text file doesn’t exist on the card, it will be created and if it already does exist, the new data will be appended to the existing data in the file. I have included two LEDs to indicate if the UNO can access the SD card. If it cannot, a RED LED will light. A GREEN LED will light when data is being written to the card.
2023:4:4,9:39:30,20.90,32.62,101278.64 2023:4:4,9:39:45,20.93,32.55,101277.30 2023:4:4,9:40:0,20.94,32.51,101281.65 2023:4:4,9:40:15,20.95,32.47,101282.42 2023:4:4,9:40:30,20.95,32.46,101279.10 2023:4:4,9:40:45,20.96,32.44,101283.10 2023:4:4,9:41:0,20.97,32.42,101282.33
1 DS1307 Clock Module 1 SD Card Module 1 SD card 2 LEDs (one red and one green) 2 220 Ohm Resistos 1 Arduino UNO R3 1 Breadboard Connector Wires
//------------- Code Starts Here ----------------------------

//-----------------------------------------
//Published by IntroductionToArduino.com
//Created by Paul Illsley (www.paulillsley.com)
//Please use and share so others can enjoy
//-----------------------------------------

//Include the Wire library
#include <Wire.h>

//Include the Time library
#include <Time.h>

//Include the DS1307RTC library
#include <DS1307RTC.h>

//Include the Adafruit_Sensor library
#include <Adafruit_Sensor.h>

//Include the Adafruit_BME280 library
#include <Adafruit_BME280.h>

//Include the SPI library
#include <SPI.h>

//Include the SD library
#include <SD.h>

// Creating bme from Adafruit_BME280 sensor (I2C)
Adafruit_BME280 bme;

// Reference SD card to Pin 4
const int chipSelect = 4;

// Defining the LED Pins
#define LED_RED 9
#define LED_GREEN 10

void setup(){

//Activate SD Card Module
SD.begin(chipSelect);

// Set Pin Modes
pinMode(LED_RED, OUTPUT);
pinMode(LED_GREEN, OUTPUT);

// if the SD card is not present, turn on the RED LED
if (!SD.begin(chipSelect)) {
digitalWrite(LED_RED, HIGH);
}

// Print a Header Line in the data.txt File
File dataFile = SD.open("data.txt", FILE_WRITE);
dataFile.println("Year:Month:Day,Hour:Minute:Second,Temperature(C),Relative Humidity(%),Pressure(Pascals)");
dataFile.close();

}

void loop(){

//Activate SD Card Module
SD.begin(chipSelect);

// if the SD card is not present, turn on the RED LED
if (!SD.begin(chipSelect)) {
digitalWrite(LED_RED, HIGH);
}

//Start the BME280 sensors
bme.begin();

// Initializing the Time tool
tmElements_t tm;

// Read the humidity value from the sensor
float humidity = bme.readHumidity();

// Read the Temperature value from the sensor
float temperature = bme.readTemperature();

// Read the Pressure value from the sensor
float pressure = bme.readPressure();

//Read the clock information as "tm"
RTC.read(tm);

// Open "data.txt" file on the SD Card and write data to it every 15 seconds.
if (tm.Second == 0 || tm.Second == 15 || tm.Second == 30 || tm.Second == 45){
RTC.read(tm);
File dataFile = SD.open("data.txt", FILE_WRITE);
dataFile.print(tmYearToCalendar(tm.Year));
dataFile.print(':');
dataFile.print(tm.Month);
dataFile.print(':');
dataFile.print(tm.Day);
dataFile.print(',');
dataFile.print(tm.Hour);
dataFile.print(':');
dataFile.print(tm.Minute);
dataFile.print(':');
dataFile.print(tm.Second);
dataFile.print(",");
dataFile.print(temperature);
dataFile.print(",");
dataFile.print(humidity);
dataFile.print(",");
dataFile.println(pressure);
dataFile.close();
digitalWrite(LED_GREEN, HIGH);
delay (2000);
}
// Turn off LED's
digitalWrite(LED_GREEN, LOW);
digitalWrite(LED_RED, LOW);
}

//------------- Code Stops Here ----------------------------
//------------- Code Starts Here ----------------------------

#include <Wire.h>
#include <Time.h>
#include <DS1307RTC.h>

const char *monthName[12] = {
  "Jan", "Feb", "Mar", "Apr", "May", "Jun",
  "Jul", "Aug", "Sep", "Oct", "Nov", "Dec"
};

tmElements_t tm;

void setup() {
  bool parse=false;
  bool config=false;

  // get the date and time the compiler was run
  if (getDate(__DATE__) && getTime(__TIME__)) {
    parse = true;
    // and configure the RTC with this info
    if (RTC.write(tm)) {
      config = true;
    }
  }

  Serial.begin(9600);
  while (!Serial) ; // wait for Arduino Serial Monitor
  delay(200);
  if (parse && config) {
    Serial.print("DS1307 configured Time=");
    Serial.print(__TIME__);
    Serial.print(", Date=");
    Serial.println(__DATE__);
  } else if (parse) {
    Serial.println("DS1307 Communication Error :-{");
    Serial.println("Please check your circuitry");
  } else {
    Serial.print("Could not parse info from the compiler, Time=\"");
    Serial.print(__TIME__);
    Serial.print("\", Date=\"");
    Serial.print(__DATE__);
    Serial.println("\"");
  }
}

void loop() {
}

bool getTime(const char *str)
{
  int Hour, Min, Sec;

  if (sscanf(str, "%d:%d:%d", &Hour, &Min, &Sec) != 3) return false;
  tm.Hour = Hour;
  tm.Minute = Min;
  tm.Second = Sec;
  return true;
}

bool getDate(const char *str)
{
  char Month[12];
  int Day, Year;
  uint8_t monthIndex;

  if (sscanf(str, "%s %d %d", Month, &Day, &Year) != 3) return false;
  for (monthIndex = 0; monthIndex < 12; monthIndex++) {
    if (strcmp(Month, monthName[monthIndex]) == 0) break;
  }
  if (monthIndex >= 12) return false;
  tm.Day = Day;
  tm.Month = monthIndex + 1;
  tm.Year = CalendarYrToTm(Year);
  return true;
}

//------------- Code Stops Here ----------------------------
Return to www.introductiontoarduino.com
|